Implementing a Tor Middle Node in the Cloud

In a world characterized by constant surveillance and the collection of personal data, safeguarding our online privacy and security becomes a fundamental necessity. Although it may seem like a daunting task, there are powerful tools available today to help protect us in the digital world. One of these tools is Tor, which allows us to browse the internet securely, privately, and anonymously. In this article, we will explore how Tor works and how we can contribute to its improvement and growth by implementing a middle node in the cloud.
What is Tor and how does it work?
Tor is a project that promotes online privacy by creating a secure and private communication network. Its operation is based on a three-step encryption process of browsing data, which is routed through three nodes responsible for decrypting one layer of security at a time. Each of these nodes only has the information of the node that precedes it and the node that follows it in the chain, ensuring a high-level online protection. This approach prevents spying, censorship, and provides an additional degree of anonymity while browsing the Internet.
What is a node in the context of Tor?
Within the context of computer networks, a node refers to a hardware device that serves various functions, including data transmission, routing, processing, and storage. In the context of Tor, nodes play a crucial role in the operation of the network, as they act as connection points responsible for redirecting encrypted traffic.
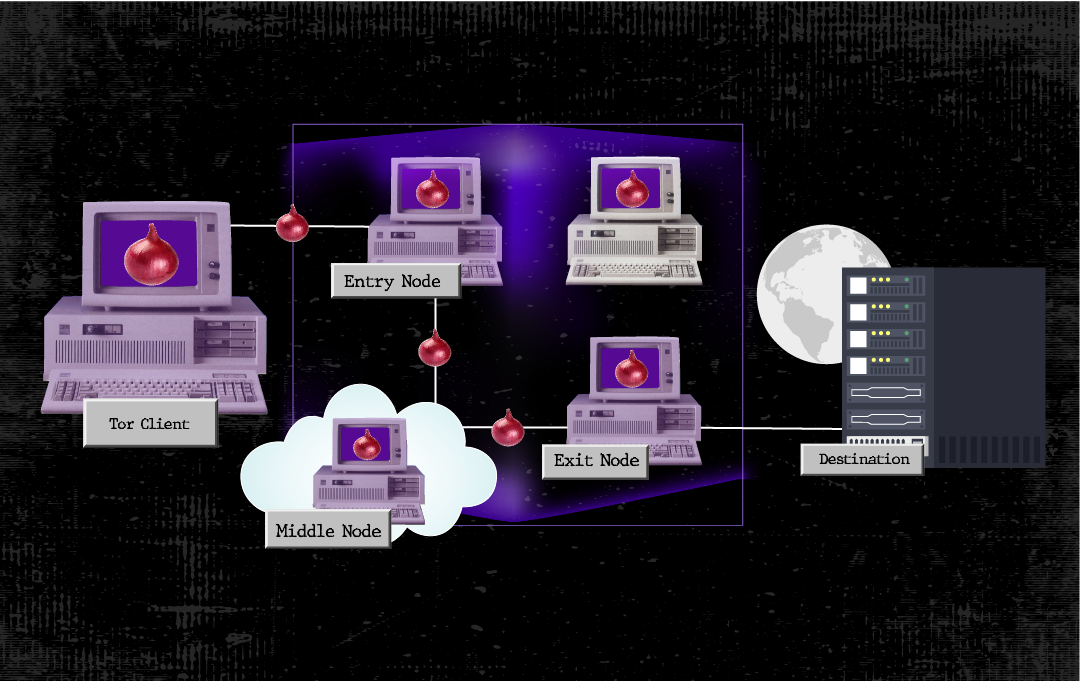
They can be primarily classified into three categories: entry nodes, exit nodes, and middle nodes. Additionally, there are the so-called “bridge nodes” that are specifically designed for regions where the use of Tor is restricted.
Entry nodes
These nodes, also known as Entry Guards, are the first to receive client traffic and are responsible for securely relaying it within the network to a middle node. Entry nodes do not have direct access to the Internet, which helps avoid potential legal issues associated with the traffic they handle. While their installation process is similar to that of a middle node, they require significant bandwidth to ensure stable operation; therefore, they are not recommended for initial implementations.
Exit nodes
Exit nodes, in contrast to other types of nodes, have the function of directing traffic to its final destination, which means these nodes have internet access. While they have the capability to view browsing data, it is important to note that they cannot identify the users to whom this data belongs to unless there is user-identifying information, and the request is not made through a secure connection (HTTPS).
Furthermore, it is essential to consider that in the absence of an HTTPS connection, an exit node could potentially inject malicious code for the user. Therefore, it is advisable to take these security and privacy aspects into consideration when using Tor.
These types of nodes are typically managed by entities such as universities and other institutions that have the capacity to address potential legal implications related to the connection traffic.
Middle nodes
Middle nodes play an important role in keeping incoming and outgoing traffic within the Tor network. These nodes do not have the ability to view browsing traffic due to multiple layers of encryption, which also means they cannot identify who made a request or where it is headed. This significantly contributes to enhancing online anonymity.
In terms of setup and maintenance, middle nodes are the most accessible and straightforward option since they require relatively low bandwidth and do not face legal risks. This makes them the best choice for those who wish to actively contribute to the Tor project and improve the privacy of network users.
In summary, a node is nothing more than a computer responsible for carrying out data transmission and routing tasks within the Tor network. As of the date of this article, the network hosts approximately 8000 nodes, excluding bridge nodes. The expansion of the Tor network is not just a goal but a necessity to ensure better performance and stronger anonymity for users. Therefore, we propose implementing middle nodes in “the cloud” as an initiative that allows interested individuals to participate actively, even if they do not have the necessary hardware to maintain a physical node.
Cloud computing
To better grasp this idea, it’s essential to have prior knowledge of the cloud computing model. It is based on offering computational resources such as CPU, RAM, storage, and networking on-demand, with the aim of reducing the acquisition and maintenance costs of physical hardware. One of the delivery approaches for this service is known as IaaS (Infrastructure as a Service), in which the cloud provider sells computational resources based on the user’s specific needs.
Features like service availability, scalability, and the simplification of management and maintenance become particularly valuable for maintaining a middle node stably. However, it is also necessary to consider some cloud features that could influence a successful implementation.
Cloud considerations
It is essential to evaluate the privacy policies of the cloud service provider and ensure they align with the level of anonymity that Tor aims to provide to its users. It is recommended to check for any conflicts that could compromise the node’s security or lead to service cancellation.
Another critical aspect to consider is the payment method when dealing with a cloud service provider. In this context, users must make monthly payments to access computational resources. Most providers typically accept debit or credit cards as a payment method, which could potentially link the node to the cardholder.
This situation raises a concern since one of the core principles of the Tor network is to preserve the anonymity of node operators. Therefore, a best practice is to look for local providers that allow for anonymous payments.
Preparations for implementation
The first step is to choose a cloud service provider based on the previously mentioned considerations. Additionally, it is advisable to review the minimum requirements and recommendations provided by the official Tor Project website. Below, we outline those we consider most relevant.
Minimum requirements:
-
10 Mbps upload and download bandwidth.
-
A minimum of 512 MB of RAM.
-
At least 200 MB of disk space dedicated exclusively for Tor.
Suggestions:
-
Have a static public IP address.
-
Choose a Linux-based operating system.
-
Avoid using the OpenVZ virtualization for the virtual machine.
Implementation of a Tor middle node in the cloud
Cloud configuration:
For the purpose of this article, we have chosen to use Google Cloud as the cloud service provider, as their policies are suitable for the implementation. Furthermore, Google Cloud provides a preconfigured Docker image with Tor. However, to provide a complete and detailed experience, we will explain the configuration step by step.
-
Create an account with the cloud provider: Each provider may have different procedures for creating an account. In the case of Google Cloud, you need to have a Gmail account and access the service, where you’ll provide the required information. Typically, it is during this stage of the implementation that the payment method is specified.
-
Create a virtual machine: Access the virtual machine management console. In the case of Google Cloud, enable the Compute Engine API and create a new instance that meets the minimum requirements mentioned earlier. During this process, you should also select the operating system; in this case, we will use Debian 11.

-
Verify the IP address: Once the instance is created, verify that it has a public IP address. Additionally, it is recommended to configure it as static to maintain the node’s stability.
-
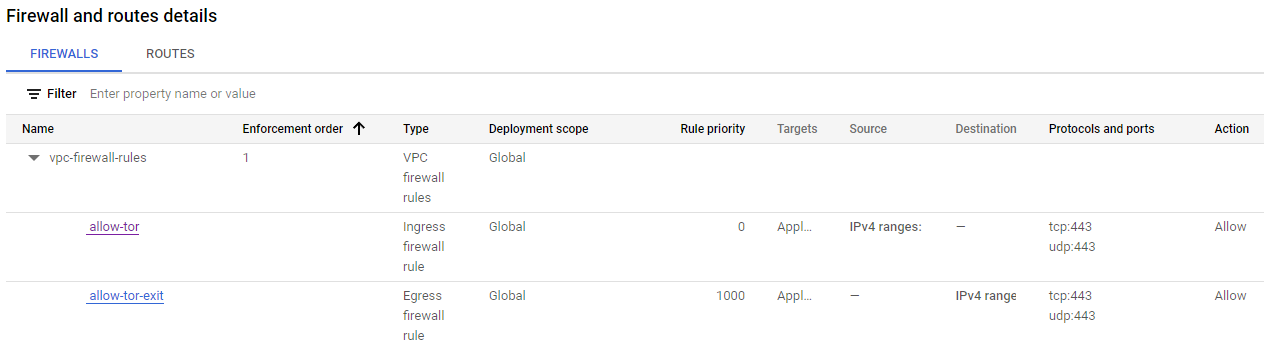
Configure the firewall: It is essential to enable inbound and outbound traffic through a specific port selected in the firewall. Later, this same port will be used in the Tor configurations to allow traffic flow within the network. In our case, we will be using port 443.
Tor configuration
To start configuring the node, we must first boot the virtual machine and establish an SSH connection with the instance. Although many cloud providers offer in-browser terminals, which can be useful if you are not familiar with using an external SSH client, for security reasons, it is recommended to make this connection using an external SSH client.
-
Access as root: Once connected to the instance via SSH, it is crucial to perform the following configurations as the root administrator. To do this, in the terminal, enter the following command line:
sudo su
-
Configure automatic updates: This step will help keep the node secure and up to date at all times. To achieve this, follow these steps:
- Install the required packages:
apt-get install unattended-upgrades apt-listchanges
- Enable HTTPS for package sources access:
apt install apt-transport-https
- Enable HTTPS for Package Sources Access: Create a new file named “tor.list” in the “/etc/apt/sources.list.d/” directory. This file will serve as the package repository for the Tor Project. Configure the file as follows (make sure to replace “bullseye” with the codename of your operating system):
  deb     [signed-by=/usr/share/keyrings/tor-archive-keyring.gpg] https://deb.torproject.org/torproject.org bullseye main
  deb-src [signed-by=/usr/share/keyrings/tor-archive-keyring.gpg] https://deb.torproject.org/torproject.org bullseye main
The file should look like this example:

- Add the GPG key for Tor packages:
wget -qO- https://deb.torproject.org/torproject.org/A3C4F0F979CAA22CDBA8F512EE8CBC9E886DDD89.asc | gpg --dearmor | tee /usr/share/keyrings/tor-archive-keyring.gpg >/dev/null
- Update the system package information:
apt update
-
Install Tor and Tor Debian Keyring: In this step, you will install Tor and a Debian package that allows you to keep the package signatures of Tor up to date. Run the following command:
apt install tor deb.torproject.org-keyring
-
Enable automatic configurations: Once you have set up configurations for automatic updates, proceed to enable them by following these steps:
- Edit the file “/etc/apt/apt.conf.d/50unattended-upgrades”. Remove all existing content and replace it with the following:
Unattended-Upgrade::Origins-Pattern { "origin=Debian,codename=${distro_codename},label=Debian-Security"; "origin=TorProject"; }; Unattended-Upgrade::Package-Blacklist { }; Unattended-Upgrade::Automatic-Reboot "true";- Edit the file “/etc/apt/apt.conf.d/20auto-upgrades” with the following information:
APT::Periodic::Update-Package-Lists "1"; APT::Periodic::AutocleanInterval "5"; APT::Periodic::Unattended-Upgrade "1"; APT::Periodic::Verbose "1"; -
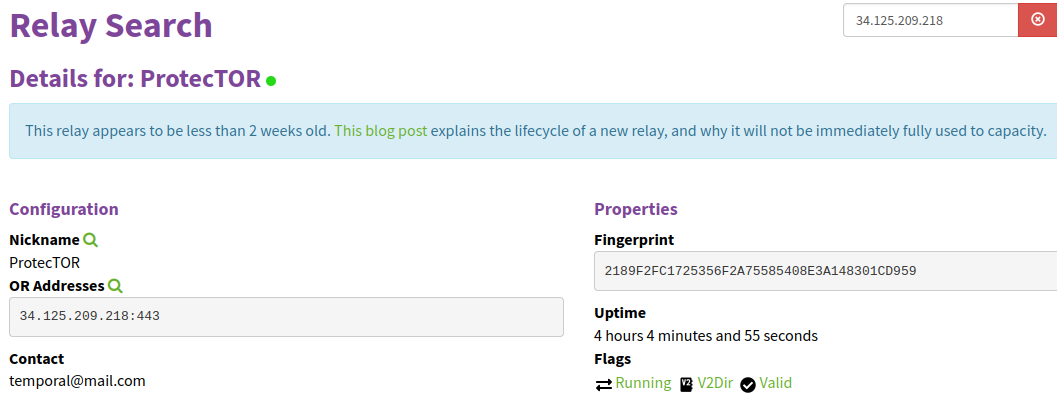
Configure the node: This step involves naming the node, providing contact information, specifying the port through which Tor network traffic will travel, and defining the node type (in this case, it will be a middle node). To perform this configuration, add or edit the “/etc/tor/torrc” file with the following information:
  Nickname ProtecTOR              #Replace with your chosen name
  ContactInfo temporal@mail.com   #Replace with your contact email
  ORPort 443                      #Replace with the port configured in your firewall
  ExitRelay 0
  SocksPort 0
*Note: Keep the ExitRelay and SocksPort settings at 0 to make the node a middle node. Additionally, be aware that the email address you configure in this step will be public on the Tor metrics website. It’s important to have access to this email so that you can receive notifications in case there are issues with your node.
-
Restart the Tor process in the background:
systemctl restart tor@default
-
Verify that the node is published: Finally, you’ll need to wait for about two to three hours before checking if the node has been published on the Tor metrics page. You can search for it using its public IP address or your chosen user nickname to ensure it is up and running and available to the network.
Conclusions and recommendations
Contributing to the Tor network without the need for physical hardware is feasible through the implementation of a cloud-based node, which is presented as an inexpensive and practical option. The costs of cloud services are generally not prohibitive and, in many cases, can match or even be lower than the expenses of a monthly internet plan. Additionally, the ability to deactivate a cloud node by simply shutting down the virtual machine hosting it is an additional advantage. Payment automatically stops when resource consumption is interrupted.
On the other hand, it is recommended to carefully study the policies of the cloud service provider to avoid the suspension of your node. Seeking a local cloud provider that allows anonymous payments can be beneficial. Furthermore, since cloud management consoles vary in their operation, it is essential to examine the configurations step by step, especially those related to the firewall.
While a node does not require constant supervision, it is a good practice to perform periodic reviews of statistics, both in terms of cloud resource consumption and node quality. Additionally, there are many other best practices for proper node management; however, this is a topic that deserves its own article.