Circumvent censorship: Create your blog using Tor Onion Services

In the context of the publication of content by journalists, activists or bloggers, every time more, the protection of the identity of writers and readers, has become a pressing need as a measure to save each people’s lives.
Onion services can be accessed only through the Tor network, adding features that, in addition to the security of HTTPS, provide protection to the privacy of those who serve them and those who access them. Onion services are an effective tool for the evasion of censorship and for the protection of identity, factors with which journalists, activists or bloggers meet daily.
This article describes how a user with basic technical knowledge can have a blog server that can be managed remotely via an SSH connection over Tor, which will keep their identity sufficiently protected and will allow - both the author and their readers - to effectively circumvent censorship as the blog is deployed using the Tor network.
Although the project provides what is necessary for a “non-technical” user to follow the instructions and deploy the blog succesfully, the user is required to have a minimum knowledge of how to execute commands in the GNU/Linux command line.
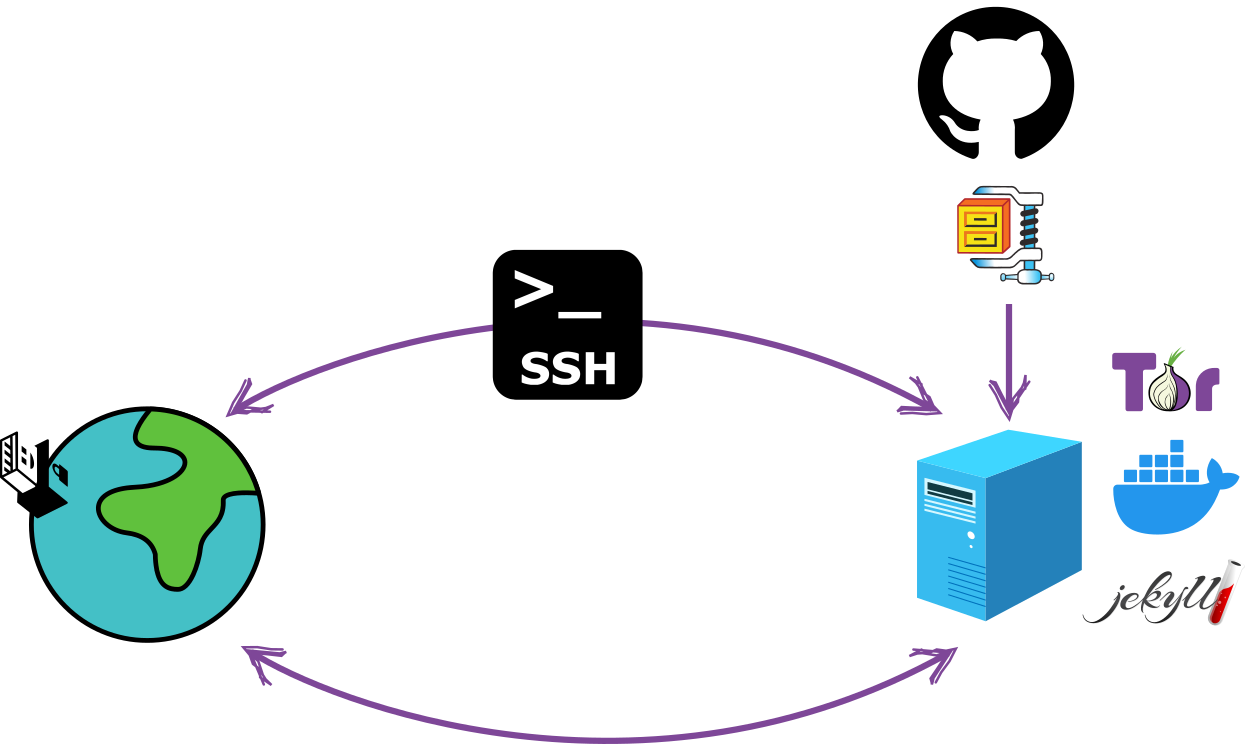
How does it work?
The objective is to provide the user with an easy-to-execute configuration that does not require high technical knowledge, and at the same time establish, as much as possible, the protection of the identity of all the parties in the context (authors and readers). The choice of the technologies used has been made keeping this in mind.
Jekyll
Jekyll is a static website generator based on Ruby, which uses markdown files for content generation. Is one of the most old static website generators but is also actively developed (version 4.3.2 was released on January 2023). It is used by millions of users around the world, which makes it ideal considering that a desired characteristic in a project oriented towards identity protection is that the tools used are common enough to not be a distinguishable element that provides specific identification.
Docker
Docker is a development platform that allows you to separate infrastructure from applications by enabling the application to run independently of the infrastructure on which it is built. The Docker image configuration used in this project delivers all the necessary dependencies so that the blog is deployed autonomously from the operating system used by the server. By principle of compartmentalization, the configuration of the server is completely isolated from the installation and configuration of the necessary dependencies for the blog. Docker is widely used globally, giving it that characteristic of being common enough. This is good from a security perspective.
Tor
The Tor network is designed to provide high protection of the identity of those who use it and also as a tool to circumvent Internet censorship. Onion services deliver encryption in the communication providing the same level of protection that HTTPS offers plus the additional protection to the privacy granted by the Tor Browser. In addition, when using onion services to publish the blog on the Tor network, a layer of protection against censorship is added for both the writer and the reader.
SSH
SSH is a communication protocol that adds transport encryption preventing attacks like password sniffing, allowing communication and interaction between two remote machines in a safe way. This project adds additional protection by configuring a specific onion service to use SSH over Tor.
Tails
Tails is an operating system designed to protect by default against surveillance and censorship. In this project, the use of Tails is not mandatory but highly recommended, especially for server administration tasks and blog content.
BEFORE YOU PROCEED: This procedure has been tested in a controlled environment, so it is recommended to continue under your own responsibility.
Workflow
Stage 1: bootstrap-script
In this first stage, an SSH channel over Tor will be obtained to continue with the installation, configuration and blog administration through a remote, secure and anonymous channel. The configuration that has been established seeks limit direct interaction with the server to the minimum necessary in order to reduce the probability of leaving traces that allow the identification of who is interacting with the server during this process.
Prerequisite: Having a computer intended to be used only as a blog server in which Debian GNU/Linux has been installed (installation from zero without keeping files or records from previous installations). Any other GNU/Linux distribution should be functional, however to keep the safety characteristics of the blog high, it is recommended to use Debian GNU/Linux especifically. The installation of the operating system for the server does not require a desktop environment and it’s recommended to install SSH-Server in the installation process of the operating system. Not having a desktop environment on the server contributes to reducing the attack surface by not adding unnecessary components to the operating system.
1. Get the local IP address of the server
In the standard configuration-
of this project, this should be the only direct interaction with the server.
To get the IP address that the server is using, you need to run, from
a command line on the server: hostname -I.
2. Run the bootstrap-script
Once the local IP address is obtained from the server, from another machine (using Tails), on the same network, run the command:
$ ssh -t {server user}@{server ip} 'wget -q https://raw.githubusercontent.com/digitalautonomy/Jekyll-Onion-blog/main/DEV/bootstrap-script.sh && bash bootstrap-script.sh'
Before running this command, make sure to change {server user}
with the
user on the server and {server ip}
with the IP address obtained in the previous step.
Running the bootstrap-script you will initially be asked for the password of the user on the server and then, in several
times, the root password of the server to do the installation of Tor and the configuration of the onion service
on which the process will continue.
Once the execution of the bootstrap-script is finished, if everything went well, you will get a log like the following:
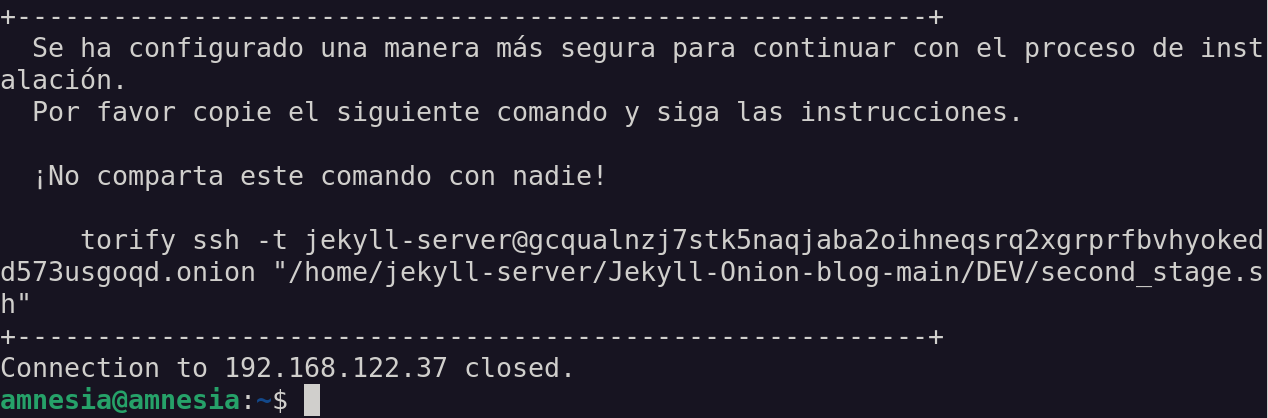
This log shows the command that you must execute (copy - paste) to continue with the installation, configuration and
deployment. Safely save the onion link (gcqualnzj7stk5naqjaba2oihneqsrq2xgrprfbvhyokedd573usgoqd.onion in
the example image) since this will be the one you must use every time you connect to your server to manage your blog.
The message: Connection to 192.168.122.37 closed. indicates that the SSH connection to the server has been closed. From
now on, to interact with your server you will use an SSH channel over Tor.
Stage 2
Execute the second-stage script
Executing the command indicated in the final log of the previous step, will start the execution of the installation, configuration and deployment of your blog. You will be asked several times to enter the server root and user password. Please, be careful to not misspell the password so you don’t have to restart the process at this point.
Once the execution of the second-stage script is finished, you will get a log like the following:
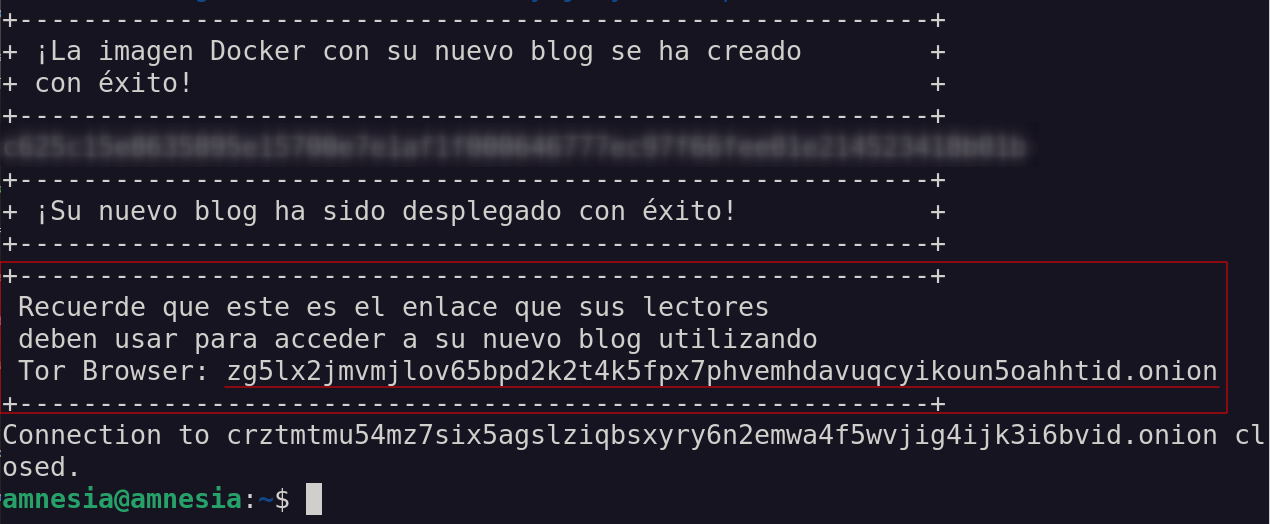
This is the log that tells you that your blog is deployed and ready to be accessed from anywhere in the world
via Tor Browser. Keep the onion service link
zg5lx2jmvmjlov65bpd2k2t4k5fpx7phvemhdavuqcyikoun5oahhtid.onion under good protection since it is the one that must be made public
so that your readers can access your blog. Don’t use any simplification tools (URL shorteners,
QR code, etc.) since that would add metadata that can represent valuable information for possible adversaries.
Personalize your blog
As a fundamental principle to keep your identity protection high, consider deleting all metadata from
the files (images and posts) that you are going to use in your blog. For this purpose, Tails includes metadata-cleaner, an
application intended to remove metadata from many file types.
Also, keep in mind that the “customization” of your blog is more a type of adjustment of some visual elements and of general information, but such elements shouldn’t allow anyone to associate them with your identity. Use very generic graphic elements (logo and hero background) and if you would like to add a contact email, make sure to use a mail server that protects your identity, preferably one that has GPG keys configured.
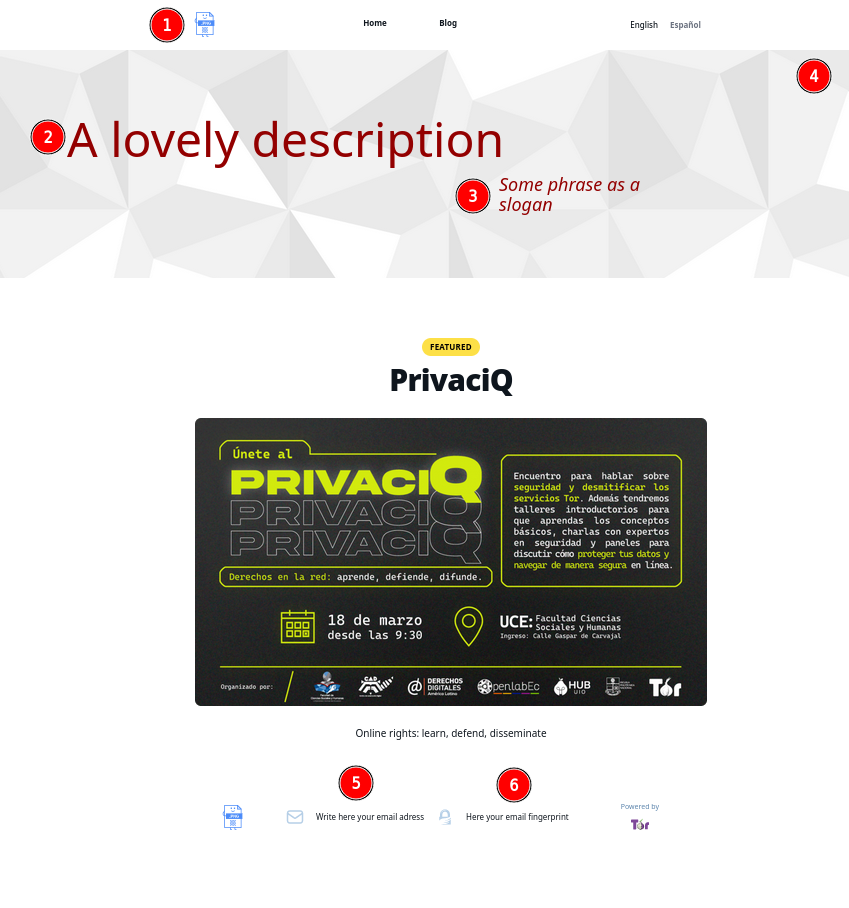
In the image above you can see the elements that can be customized easily. You can actually customize all the design of the blog since on your server you have a copy of all the source code, but doing so will require more knowledge and interaction with the server. You should also keep in mind that the more specific your blog design is, the more identification elements you will be adding.
- Logo (1): The logo symbol of your blog, as seen in the previous image, appears at the top and bottom (header and
footer) of your blog. To replace the default logo you must use an image in
.svgformat and the name of the file should belogo.svg. Once you have decided which image to use as the logo, you should run the following command to update the logo on your blog:
$ torify scp logo.svg {server-user}@{ssh onion service}:/home/{server-user}/Jekyll-Onion-blog-main/assets/images/
In this command you should replace {server-user} with the username on the server and {ssh onion service} with the
onion link you got at the end of the first stage.
- Hero background (4): This must be an image in
.pngformat whose file name must bebackground-desktop.png. To update this image on your blog, use the command:
$ torify scp logo.svg {server-user}@{ssh onion service}:/home/{server-user}/Jekyll-Onion-blog-main/assets/images/
where, as in the previous case, you must replace {server-user} with the username on the server and
{ssh onion service} with the onion link you got at the end of the first stage.
-
To modify description (2), slogan (3), email (5) and fingerprint (6), three files must be modified in the server:
/_data/locations.yml,/_i18n/en.ymland/_i18n/es.yml. The first thing will be to establish an SSH channel to modify the files on the server, by running:$ torify ssh {server-user}@{shh onion service}Again, keep in mind to change
{server-user}to the username on the server and{ssh onion service}to the onion link you got at the end of the first stage.Once you’re logged into the server, you can edit the
locations.ymlfile to change the email address and the respective fingerprint:$ nano /home/{server-user}/Jekyll-Onion-blog-main/_data/locations.ymlTo edit the files containing the description and the slogan you can use:
$ nano /home/{server-user}/Jekyll-Onion-blog-main/_i18n/en/en.ymlfor the file in English and
$ nano /home/{server-user}/Jekyll-Onion-blog-main/_i18n/es/es.ymlfor the file in Spanish.
Add blog posts
To add new blog posts, first, in Tails, download the template for a new blog post from
here. Edit this
file with the content of your post and save it respecting this file naming convention
yyyy-mm-dd-{post-title}.md (replacing {post-title} with the actual title of your post). Here you should keep in mind that
the English and Spanish versions of your post must be two separate files but with exactly the same name
archive.
Once you have the posts ready, to upload them to the server use the command:
for the English version of the post and
$ torify scp {archivo-del-post.md} {server-user}@{ssh onion service}:/home/{server-user}/Jekyll-Onion-blog-main/_i18n/es/_posts/
for the Spanish version of the post.
In each case, replace {post-file.md} with the name of the file that contains the post (remember that names
of the English and Spanish files must be the same), and {server-user} and {ssh onion service} with the data
corresponding to the server as in previous steps.
You can find more detailed information in the official project repository, available at:
https://github.com/digitalautonomy/Jekyll-Onion-blog.
In conclusion:
- The fight against censorship and the protection of privacy requires tools that reach everyone independently of their economic condition and their level of technical knowledge. Having tools like the ones presented here allows all those who need to protect their identity and overcome the barriers imposed by censorship, to access resources to meet the needs of their context (threat model).
- There is no security model that guarantees or that covers 100% of gaps tthat can be used to attack you. There are risks in every tool intended for the protection of security, therefore - in terms of security – you can’t think in an absolute way. It is essential that whoever evaluates the use of tools such as the ones described here, also makes an assessment of which are the risks that must be covered and which additional measures should be kept in mind to reduce the attack surface. The highest possible safety standards have been suggested here,, however, for a particular context, these standards may be exaggerated or, on the contrary, not enough.